Related posts widget is very important for a blog, because it increases the number of page views and also help the visitor to view other posts related to blog. Now here is wonderful trick to display links to related posts beneath each posts. At their blogs today there are many types of related post widget, and related items thumbnail images using HTML, Java script, etc. .. Here I will show a method that is easy to show install.It only title jQuery.It related post widget will look like a picture below.

How To Add Related Posts Widget For Blogger
I have seen few who are showing the Related Posts Widget of posts below their posts. It’s also a good script placement which can increase your pageviews.
To add the code , just follow the above instructions.
I have to write two set of instructions for each steps, as some of you are using the default layout, and some of you are using the new layout.Backup your template before attempting this tutorial.
Step 1:
In old layout: Go to Dashboard - Design - Edit HTML - Expand Widget Templates.

In new layout: Go to Dashboard - Template - Edit Template HTML - Expand Widget Templates.
Now find (CTRL+F) this code in the template:
And immediately before it, paste this code:
If you want to change the title of your widget you can edit this line of the above code
If you want you can edit the blue and black colors present in this code
2.Now find this line of code
If you cant find it then try finding this one
Now immediately after any of these lines(whichever you could find) place this code snippet
And now click Save Template
You can adjust the maximum number of related posts being displayed by editing this line in the code.
How To Add jQuery Related Posts Widget for Blogger

Typical Usage #1
In old layout: Go to Dashboard - Design - Edit HTML - Expand Widget Templates.
In new layout: Go to Dashboard - Template - Edit Template HTML - Expand Widget Templates.
Now find (CTRL+F) this code in the template:
And immediately after it, paste this code:
And now click Save Template
Typical Usage #2
How to Install Related Posts Widget related links at the side column
I have to write two set of instructions for each steps, as some of you are using the default layout, and some of you are using the new layout. So, let's see how to install this cool widget in your blog..
Step 1:
If you're using the old Blogger interface: Go to Dashboard - Design - Page Elements - Add a Gadget.
 Add a Gadget of HTML/JavaScript type.
 If you're using the new Blogger interface: Go to Dashboard - Layout - Add a Gadget
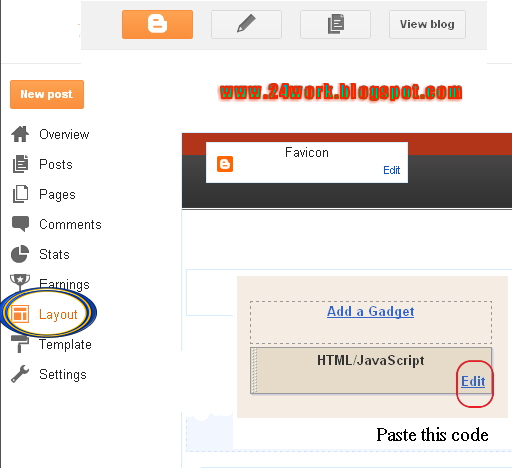 2.Click on 'Add a Gadget' on the sidebar.
3.Select 'HTML/Javascript' and add the one of code given below
4. Now Click On Save 'JavaScript' You are done.
And now click Save
How To Add Related Posts Widget For Blogger
I have seen few who are showing the Related Posts Widget of posts below their posts. It’s also a good script placement which can increase your pageviews.
To add the code , just follow the above instructions.
I have to write two set of instructions for each steps, as some of you are using the default layout, and some of you are using the new layout.Backup your template before attempting this tutorial.
Step 1:
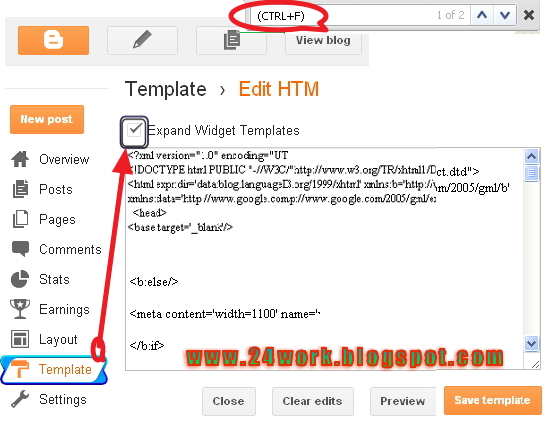
In old layout: Go to Dashboard - Design - Edit HTML - Expand Widget Templates.
In new layout: Go to Dashboard - Template - Edit Template HTML - Expand Widget Templates.
Now find (CTRL+F) this code in the template:
</head>
And immediately before it, paste this code:
<!--Related Posts Scripts and Styles www.bdlab.blogspot.com Start-->
<!--Remove--><b:if cond='data:blog.pageType == "item"'>
<a href="http://24work.blogspot.com" target="_blank" title="Blogger Widgets"><img src="http://safir85.ucoz.com/24work-blogspot/cursor-24work-10.png" border="0" alt="Blogger Widgets" style="position:absolute; top: 0px; right: 0px;" /></a><style type="text/css">
#related-posts {
float:center;
text-transform:none;
height:100%;
min-height:100%;
padding-top:5px;
padding-left:5px;
}
#related-posts .widget{
padding-left:6px;
margin-bottom:10px;
}
#related-posts .widget h2, #related-posts h2{
font-size: 1.6em;
font-weight: bold;
color: black;
font-family: Georgia, “Times New Roman”, Times, serif;
margin-bottom: 0.75em;
margin-top: 0em;
padding-top: 0em;
}
#related-posts a{
color:blue;
}
#related-posts a:hover{
color:blue;
}
#related-posts ul{
list-style-type:none;
margin:0 0 0px 0;
padding:0px;
text-decoration:bold;
font-size:15px;
text-color:#000000
}
#related-posts ul li{
background:transparent url(https://blogger.googleusercontent.com/img/b/R29vZ2xl/AVvXsEjGDDH4WyqwASbjtuh9xyPhUfGUVjeMWkIoVkNxAjgAWieGvImolkQPv_BH3s8ZlVd14BcBkHJoLeFfGzMfJ8WZtQBwqXqj5DCAvFNCiWJS-01tlXZcEjygTswov945ssOy0Ai60r3fABc/s200/greentickbullet.png) no-repeat ;
display:block;
list-style-type:none;
margin-bottom: 13px;
padding-left: 30px;
padding-top:0px;}
</style>
<script type='text/javascript'>
var relatedpoststitle="Related Posts";
</script>
<script src='http://safir85.ucoz.com/24work-blogspot/related-posts/related-posts-for-blogger-24work.js' type='text/javascript'/>
<!--Remove--></b:if>
<!--Related Posts Scripts and Styles www.bdlab.blogspot.com End-->
If you want to change the title of your widget you can edit this line of the above code
var relatedpoststitle="Related Posts";
If you want you can edit the blue and black colors present in this code
2.Now find this line of code
<div class='post-footer-line post-footer-line-1'/>
If you cant find it then try finding this one
<p class='post-footer-line post-footer-line-1'/>
Now immediately after any of these lines(whichever you could find) place this code snippet
<!-- Related Posts Code www.bdlab.blogspot.com Start-->
<!--Remove--><b:if cond='data:blog.pageType == "item"'>
<div id='related-posts'>
<b:loop values='data:post.labels' var='label'>
<b:if cond='data:label.isLast != "true"'>
</b:if>
<b:if cond='data:blog.pageType == "item"'>
<script expr:src='"/feeds/posts/default/-/" + data:label.name + "?alt=json-in-script&callback=related_results_labels&max-results=6"' type='text/javascript'/></b:if></b:loop><a href='http://24work.blogspot.com'><img style="border: 0" alt="Related Posts Widget for Blogger" src="https://blogger.googleusercontent.com/img/b/R29vZ2xl/AVvXsEiNW6CKMqjHBe5LUbH_YcgepdSvJfzPQ495dwe2Y2kOlqOqmYXfdGFDoOHrhdKQ6RbT-pKMyn-eTJKtsdR1WXVblQELsieRSeGazSwKgRtST2KXVU5tJB_t6QdsIM4cFhjg4wLhZHXilkSx/s1600/blogger-widgets.png" /></a>
<script type='text/javascript'>
var maxresults=5;
removeRelatedDuplicates(); printRelatedLabels("<data:post.url/>");
</script>
</div>
<!--Remove--></b:if>
<!-- Related Posts Code www.bdlab.blogspot.com End-->
And now click Save Template
You can adjust the maximum number of related posts being displayed by editing this line in the code.
var maxresults=5;
Note: If you want to display the Related Posts on every page, then remove the lines of code starting with <!--Remove-->
How To Add jQuery Related Posts Widget for Blogger
Typical Usage #1
To display related links at the end of every post. copy this code into a new HTML/Javascript widget and place at the bottom of the post or at the footer in the page elements section. Widget uses jQuery v1.3.2, If you already included jQuery into your blog. no need to do it again.
In old layout: Go to Dashboard - Design - Edit HTML - Expand Widget Templates.
In new layout: Go to Dashboard - Template - Edit Template HTML - Expand Widget Templates.
Now find (CTRL+F) this code in the template:
<data:post.body/>
And immediately after it, paste this code:
<a href="http://24work.blogspot.com" target="_blank" title="Blogger Widgets"><img src="http://safir85.ucoz.com/24work-blogspot/cursor-24work-10.png" border="0" alt="Blogger Widgets" style="position:absolute; top: 0px; right: 0px;" /></a><script src="http://ajax.googleapis.com/ajax/libs/jquery/1.3.2/jquery.min.js" type="text/javascript"></script>
<script src="http://safir85.ucoz.com/24work-blogspot/related-posts/related-posts-widget-1.0-24work.js" type="text/javascript"></script>
<script type="text/javascript">
relatedPostsWidget({
'containerSelector':'div.post-body'
,'loadingText':'loading...'
});</script>
<script src="http://safir85.ucoz.com/24work-blogspot/related-posts/related-posts-widget-1.0-24work.js" type="text/javascript"></script>
<script type="text/javascript">
relatedPostsWidget({
'containerSelector':'div.post-body'
,'loadingText':'loading...'
});</script>
And now click Save Template
Typical Usage #2
To show related links at the side column. copy this code into a new HTML/Javascript widget and place at the side in the page elements section.Again, If you already included jQuery into your blog. no need to do it again.
How to Install Related Posts Widget related links at the side column
I have to write two set of instructions for each steps, as some of you are using the default layout, and some of you are using the new layout. So, let's see how to install this cool widget in your blog..
Step 1:
If you're using the old Blogger interface: Go to Dashboard - Design - Page Elements - Add a Gadget.
3.Select 'HTML/Javascript' and add the one of code given below
4. Now Click On Save 'JavaScript' You are done.
<a href="http://24work.blogspot.com" target="_blank" title="Blogger Widgets"><img src="http://safir85.ucoz.com/24work-blogspot/cursor-24work-10.png" border="0" alt="Blogger Widgets" style="position:absolute; top: 0px; right: 0px;" /></a><script src="http://ajax.googleapis.com/ajax/libs/jquery/1.3.2/jquery.min.js" type="text/javascript"></script>
<script src="http://safir85.ucoz.com/24work-blogspot/related-posts/related-posts-widget-1.0-24work.js" type="text/javascript"></script>
<script type="text/javascript">
relatedPostsWidget({
'loadingText':'loading...'
});</script>
<script src="http://safir85.ucoz.com/24work-blogspot/related-posts/related-posts-widget-1.0-24work.js" type="text/javascript"></script>
<script type="text/javascript">
relatedPostsWidget({
'loadingText':'loading...'
});</script>
And now click Save
No comments:
Post a Comment